Converting Core Data programs to work with SwiftData - Part 1
Swift, SwiftUI, SwiftData
SwiftData as a replacement to Core Data
I have been using the Core Data framework for persistence on my iOS/macOS projects. Core Data is an interesting framework that links the Object-Oriented world within an application’s memory with a database or other data store to provide persistence. It is a tricky framework to learn, especially dor developers who are used to relational databases. Queries in Core Data do not use SQL or similar relational database languages but they have their own optimisation mechanisms. Apart from the bias towards relational databases, the difficulty with Core Data is that it needs a lot of setting up and using object classes to be used with Core Data puts a lot of burden on those classes/objects.
One positive side of Core Data is that - although it has originally been developed with/for Objective-C - it works well with Swift. The initial implementations of the declarative SwiftUI framework also worked well with Core Data, but it was tricky to dynamically change queries/filters with changes in the data. The SwiftUI Core Data interface has also been improved/simplified in the last few releases, but it is still an adventure. Thus some developers prefer other persistence libraries
Apple announced the SwiftData framework as part of the Xcode Beta development environment released with the first Beta of iOS 17 / macOS 14 as a much more usable persistence framework. I have followed the presentations about SwiftData at the World-Wide Developers’ Conference held in June 2023 and have done some test programming since then. As expected, the Beta releases for SwiftData have been quite buggy and it was difficult to attempt to convert a reasonably big program from Core Data to Swift Data. What caused the problems for me in Betas 1-7 was mostly to do with making the object classes to conform to the Codable protocol (e.g. for encoding/decoding objects to JSON) and using SwiftData with CloudKit (so as to be able to replicate the user data/databases to other devices through iCloud). Since most of my programs used CloudKit and also needed encoding/decoding with JSON, I was not able to much useful stuff. Beta 8 of iOS/MacOS changed all that, since most problems were resolved. I then attempted to convert a Diet Diary application that I am developing now from Core Data-CloudKit to SwiftData-CloudKit.
This article shows what I had to do for this conversion. I have been able to make the application work with SwiftData with minimal issues.
Caveat: Apple has sample programs explaining how to do this. One of their suggestions was to do the transition gradually, since Core Data and SwiftData can co-exist in an application. I did not follow their advice. I wanted to see how I can forcefully convert an application. I also did not have any issues with losing data, since my application is far away from release.
Converting the Data Model
Core Data uses a separate Core Data model file (.xcdatamodeld file) in an application for the definition of all classes and their properties. We can let XCode generate all the Swift code from this model, but usually there will be need to add additional methods and non-transient properties, thus we typically extend the basic class Core Data generates.
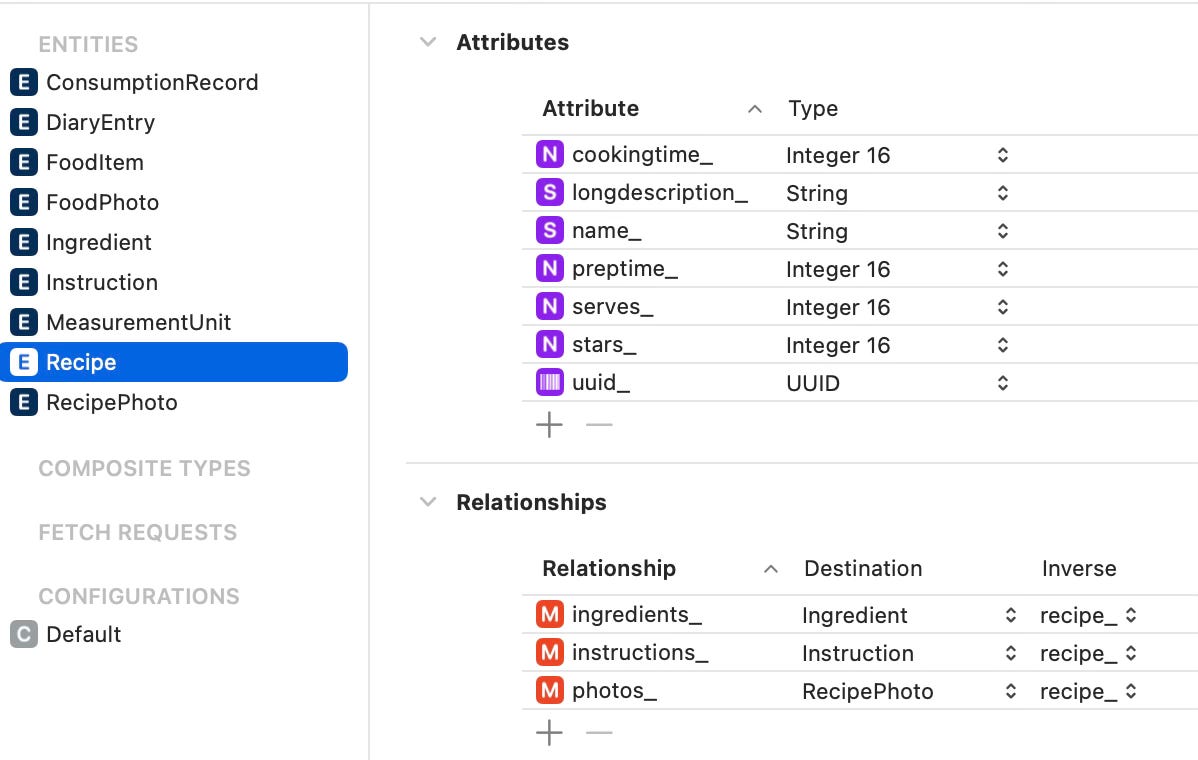
You can see below a Recipe object model with attributes and relationships to other objects. XCode creates a Recipe class and populates it with all the attributes seen here. You can then populate a separate file with an extension to Recipe and add other attributes or functions.
Here I must note that there are some extra restrictions imposed by the CloudKit library. Since we would like all user data to be replicated to all devices for the same user (effectively a copy of the database on each device, to be synhronized when one of the databases changes). CloudKit requires all attributes to be optional. This creates a bit of difficulty in coding since we have to take care of the optional attributes constantly. I usually solve this by providing new computed properties in the class extension. For example, if longdescription_ is an optional string in the database, we define a computed property called longDescription which always returns a string, albeit empty. Thus it is easier to use this layer of computed properties instead of the original ones CoreData/CloudKit forces us.
One other complication is that CoreData requires us to state the properties of integer attributes, namely integer 16, integer 32 etc. to show the number of bits. This adds a layer of complexity since Swift is a strongly typed language and requires explicit conversions from one type to another.
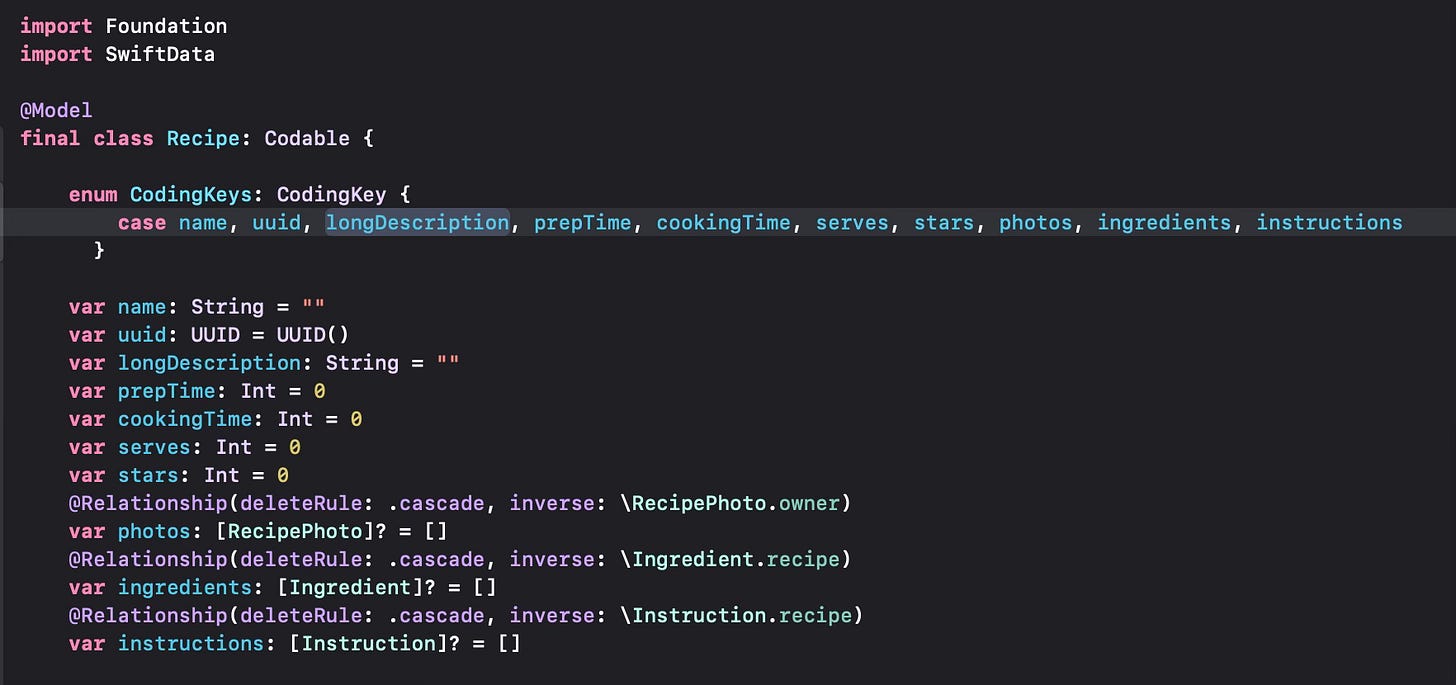
This CoreData model will be converted by declaring the class and variables as they are represented in memory and annotating them with the new @Model macro. Let us look at what the Recipe object looks like under SwiftData.
@Model declares that the class it annotates should be persisted with the SwiftData mechanism. I’m using final in order to make sure this class will not be sub-classed, since SwiftData does not seem to be allowing inheritance at this time.
CodingKeys is used to develop custom encode/decode functions for the Codable protocol, I will use this to provide JSON import-export.
All attributes are just declared normally, but they have initial values. (This seems to be a SwiftData requirement.)
Relationships to other objects are declared via attributes and annotated with the @Relationship macro. I tried to use the .unique keyword for some of the attributes, but at this time it is not supported, so I introduced UUID attributes to classes that I wanted to be identifiable for SwiftUI views.
One-to-many relationships can be defined by making the attribute a collection (I used arrays). Many to many relationships are also possible by declaring the inverse of a relation as a collection.
SwiftData-CloudKit combination also forces us to declare all relationship attributes as optional.
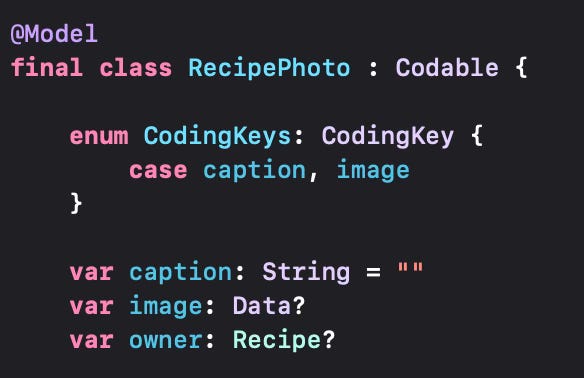
Let us now check the RecipePhoto class to see how the relationship photos is matched in that class.
As you can see, we do not have to repeat the @Relationship macro for the inverse relation, since SwiftData takes care of it itself. So owner becomes the optional inverse relation showing which recipe this photo belongs to.
One improvement is that we can use normal swift attributes like Int instead of explicit sizing for CoreData attributes.
One problem you have to plan for is the fact that the structure of the class and the attributes will inevitably change and the backups (e.g. in JSON) may not be possible import, so be ready to convert existing data explicitly by letting CoreData and SwiftData co-exist in the transition period.
SwiftData setup
The whole Persistence code used by CoreData can now be removed from the project. SwiftData requires us to declare which objects will be persisted in the SwiftData container in views that require them. I preferred to do this in the application by passing this as an environment variable to ContentView, which is the root for all other views in my application.
We can change some of the features of the model container storing the objects (such as making it an XML file, setting its name etc.) but I used the default format, thus objects will be persisted in an SQL file named default.store. This will also be synchronised to other devices of the same user if they have this application installed. The name of the iCloud container to be used for sharing is defined in the iCloud Container Identifiers entitlement.
(to be continued…)


